Wind Generator
Model N2000W Installing and Operating Instruction |
| 1.
Application and Feature |
- The wind power generator is an equipment to convert wind energy
into electric power which is changed into storage battery set
.It can be widely used in rich wind areas but without normal
energy supply from any power system .It is capable of providing
AC220V/50HZ and AC 110V/60HZ for lighting, TV, telecommunication
equipment and so on.
- Features of the wind-generator are: wind range of working speed,
good generating performance in low wind speed with starting
wind lf Beaufort Force 2, high efficiency, operating stably
and safety even in wind of Beaufort Force 8, easy to operate,
reliable quality, long service life.
|
| 2.
Structure |
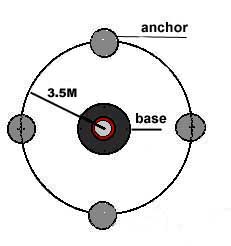
- The
unit is mainly composed of wind rotor, permanent magnet generator,
tailvane, stand, electric system. Electric system is composed
of electric controller, storage batteries, electric cable, ect.(Fig.1)
|
| 3.
Installation procedure |
|
|
|
| Fig
2 |
Fig
3 |
-
3) Fit together the upper, middle, lower mast and the base. Lay
the base on the central hole, and lay down the mast through the triangle pit. (Fig, 3”A”).
Fix the base plate with foundation bolts, washers and nuts
(M16). Flatten the base plate and pour the hole with crushed
stone concrete.
-
4) Put up the disk (slipped on the upper mast that has four edge
holes) to the upper. Insert each slip hook (one end of guy
wires) through the edge hole and ring the upper mask.. Hook
up the open screw buckles of three guy wires (the other edge
) (Fig.3 A.B.D) with ground anchors, erect up the mast then
hook up the last buckle. (Fig.3“C”).Adjust the length of
the buckles or the wires to make the mast tend to vertical.
(Caution: Do not make the guy wires too tightly.)
-
5) After the foundation solidifies(about 5to 7 days), the wire
precisely to nuts (M16) on the  base
plate, adjust the length of the buckle or the wires precisely
to make the mast vertical. base
plate, adjust the length of the buckle or the wires precisely
to make the mast vertical.
-
6) Unscrew the two screw buckles (Fig, 3”B,C”)and then loose
the buckles at U-shape fork which is last hooked up. (Fig.3
at”C”),lay down the mast direct “A”,.Sustain the mast
at the lower end of the upper mast with a sample stand (at
about half-meter high).
-
7) Install the ring to the shaft of the top, then insert the
supporting shaft of the generator into the top of the upper
mast . Screw the M10 bolts and nuts.
-
8) Insert the cable through the bottom to the top of the masts,
pass through the supporting shaft and extend out at 0.5 meter, pass through the rubber passage
ring on the top, and the passage hole (¢16)on shell of the
generator. Connect the cables separately to the heads on the
cable plate and connect to the ground cable plate. and extend out at 0.5 meter, pass through the rubber passage
ring on the top, and the passage hole (¢16)on shell of the
generator. Connect the cables separately to the heads on the
cable plate and connect to the ground cable plate.
-
9) High the yaw arm to the shell of the generator with a pin
(¢5X75),a washer, and a spill (¢3).Fix the yaw arm, tail
fin together with a bolt (M12)and a washer, a spring washer
tightly.
-
10) Fix the hub on the axle of the generator tightly with a nut
(M16)and a spring washer.
-
11) Install the blades to the hub with bolts (M10X80),spring washers
and nuts (M10). The twist  moment
of the bolt is about 5KG.M. moment
of the bolt is about 5KG.M.
Caution: Do not exchange the blades at will. They are formed
to one set selected particularly according to weight ,please
check the marks.
-
12) Fix the nose cone to the hub with bolts (m6), washers, and
spring washers.
-
13) Erect up the masts and hook up the guy wires. Adjust the length
of the four screw buckles precisely to make the masts vertical.
Fasten the guy wires, and decrease the tolerance at the most.
Check the connecting parts, fastening parts, wind the buckles
one by one with galvanized iron wire to prevent from loosing
and unhooking. Apply the anticorrosive oil on the screw poles
of the buckles finally.
- 14) Read the instruction about the electric controller carefully
before fixing. According to the
 instruction, connect the storage batteries, generator and resistance
box with the corresponding connective poles of the electric
controller. The connection must be fasten and good.Don’t mix
positive (+)and negative(-) poles. The connection end of the
batteries with grease in order to decease the erosion. instruction, connect the storage batteries, generator and resistance
box with the corresponding connective poles of the electric
controller. The connection must be fasten and good.Don’t mix
positive (+)and negative(-) poles. The connection end of the
batteries with grease in order to decease the erosion.
|
| 4.
Operation and Maintenance |
Please read the instruction carefully before used. Do not install
or lay down the masts due to safety in windy weather. Other
caution are as follows:
-
1)The wind-generator
must be erected where the wind is unblocked and no obstacles
can be found.
-
2)Check the
masts and four guy wires frequency, and adjust in time when
they become loose.
-
3)Do not stand
under the unit when the rotor runs fast.
-
4)Stop the machine
and check immediately when abnormal noise or severely shocks
occur during the operation.
-
5)The wire of
this electrical system do not be connected with other power
wires. Suggestion; Use direct currency in light. Use alternative
currency by inverting in electric instruments.
- 6)First the wire
of the electrical system must be connected with battery, then
the input wire of the generator. When dissembling, you should
loose the input wire of the generator, then the battery.
- 7)Dissembling
of rotor
a. Remove the nose cone.
b. Remove the nut (M16) and the washer from the axle of the generation.
c. Use the special tools with the generation. First screw the socket
onto the hub (to the upmost ), then loose the bolt (M16) with
wrench, and remove the rotor.
|
|